








Using the Olympus E-M5 Mk II as a film ‘scanner’
by JL Williams (jlwilliams-us.tumblr.com)
If you’re a long-time photographer (like me) you may have lots of old (and not-so-old) film negatives that you’d like to bring into the digital age. But if you’re an impatient photographer (like me) you probably haven’t made much progress!
That’s because scanning negatives into digital files has always been a PITA, no matter how you do it. Sure, you can farm the job out, if you don’t mind sending irreplaceable negatives off to parts unknown. Or you can buy a scanner and do it yourself… but cheap scanners produce, well, cheap results. Better scanners are slow, inconvenient, and require a lot of post-scan touchup — especially if you’re scanning silver-based black-and-white film, which defeats the “auto-fix” routines that many scanners promise.
(Quick explanation of why: color neg and slide films, by design, transmit infrared light, so they won’t heat up during enlargement or projection. That lets the scanner distinguish between a small detail and a small chunk of dirt on the neg… a small detail will transmit IR, but a chunk of dirt won’t. Silver-based films, on the other hand, block infrared, so the scanner can’t tell details from dirt.)
So when the Olympus E-M 5 Mk II camera was announced, with its clever sensor-shifting “high res shot” mode, plenty of us wondered if we could use this feature to get 40-megapixel JPEGs (or 64-megapixel raw files) of film negatives. For many types of subjects, high res shot mode is pretty limited, because it requires the subject to be absolutely motionless during its eight-exposure cycle — but that shouldn’t be a problem when copying negatives, right?
So I tried it. Here’s what I found:
Building the Rig
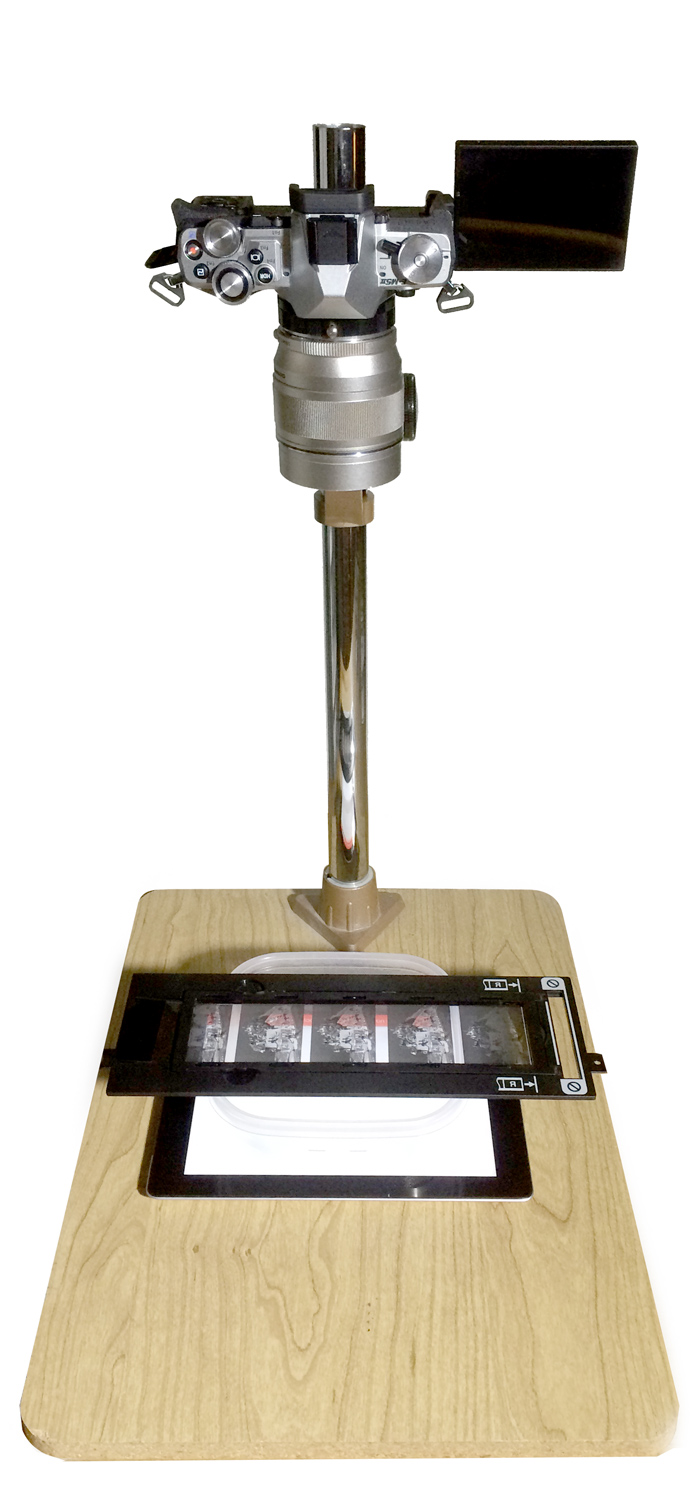
I decided to test using a medium-format black-and-white negative, since these are capable of excellent digital quality but are often problematic to scan.
Building a rig to photograph these negs with the E-M 5 Mk II would have been easy if I owned a macro lens — but I don’t, and I didn’t intend to buy one until I was sure this process would work! So instead I had to cobble together a macro setup using some inexpensive, generic, non-coupled extensions tubes I happened to have. Even the shortest extension available with these tubes was too long to cover a full 6x6cm negative with most of my lenses; the only one that would work was my 75mm f/1.8 Olympus, an excellent lens for general photography, but not necessarily ideal for macro shooting.
Another problem was that since my extension tubes aren’t coupled electronically to the camera, I couldn’t just set the lens to my desired aperture and focusing distance. Instead I had to resort to an old trick: mount the lens directly on a camera, use the manual focus and DOF preview to get the settings I wanted, and then immediately remove the lens without turning off the camera. This trick let me mount the lens on the extension tubes without losing my previous settings.
I mounted the camera on an old-fashioned copy stand I happened to own, and the photo part of the setup was done.
For illuminating the negs, I had the idea of using my iPad. Sure, there are lots of less expensive and probably brighter ways to do this, but I already had the iPad, and it can generate a large area of bright, even light. Several free apps are available for turning it into a lightbox; I used one called Leuchtpult LT.
I placed my test film into the medium-format film holder that had come with my scanner, and laid it on top of the iPad. Problem: the distance between the film and the iPad was so short that the iPad’s individual LEDs were within the plane of focus, causing a grid pattern to appear behind the image.
Solution: I put a translucent plastic refrigerator container on top of the iPad, and laid the film holder across that. Sounds crude, I know, but it worked perfectly! The plastic container separated the film enough from the iPad that no patterns were visible. And unlike a flatbed scanner, this setup leaves absolutely NO glass surfaces near the film plane — so, far fewer dust and cleaning headaches.
Shooting the Tests
‘Scanning’ with the camera
To test the setup, I chose a black-and-white negative I had made in 1993, using a Bronica 645 camera. It showed the members of the Ballet Omaha dance company perched on a Union Pacific “Big Boy” locomotive (long story…) and contained a wide range of tones and lots of detail.
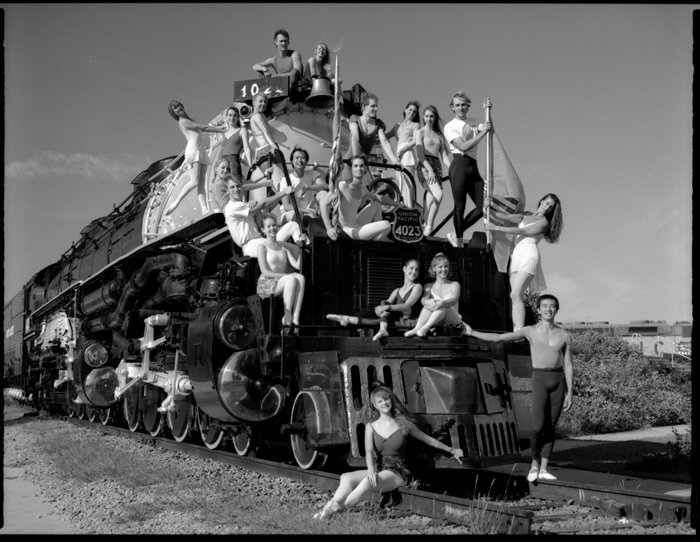
I focused the E-M5 Mk II on the negative using its 10x magnified critical focusing view and the swiveling LCD viewfinder. Focusing on the grain structure of the film was easy at this magnification. I adjusted the exposure by using the viewfinder’s “blinkies” feature, which highlights over- or under-exposed areas, picking a midrange value that avoided blinkies at either extreme.
The Mk II’s high res shot mode requires the camera to be very still, and I really should have used a remote release to trigger it. I didn’t have one handy, so instead I set the camera to wait 8 seconds before starting the high res shot sequence. After the 8-second delay was up, it took the camera only a few seconds to make and assemble the high res shot. Since high res shots use the electronic rather than the mechanical shutter, the process was eerily silent.
I had chosen the raw+JPEG option, so I came away with both a 16.7mb JPEG file and a 104.5mb Olympus ORF raw file. I opened the raw file in Adobe Photoshop CC 2014, using Olympus’ recently-released High Res Shot Raw File plug-in.
Comparison scan with a flatbed scanner
After making the camera shot, I transferred the film holder to my Canon 8800F flatbed scanner and launched Hamrick Software’s Vuescan to perform a scan. I used the scanner’s full 4800-pixel-per-inch resolution setting and saved a 179mb TIFF file.
To compare the two images on an equal basis, I downsampled the scanner image to match the camera’s 6560-pixel width. This left me with two approximately-61-megapixel images to compare.
I didn’t spend much time optimizing the highlight and shadow values, since at this stage I was mostly interested in detail and sharpness. Both images had plenty of latitude for adjustment, and I’m sure I could have gotten similar tonal ranges from both.
The results
Let’s have some fun: Instead of telling you my conclusions first, I’ll show you the images and then reveal which came from where. Both are pixel-for-pixel crops of the locomotive’s number plate:
Image A
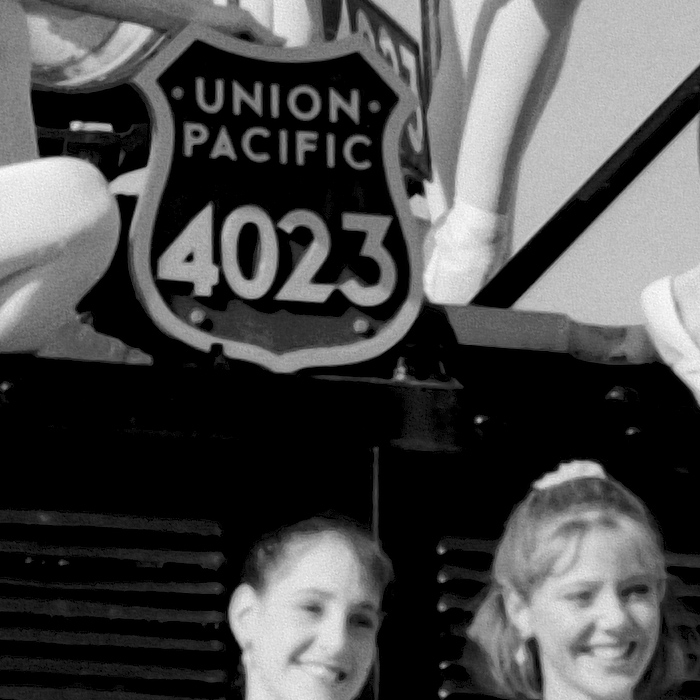
Image B
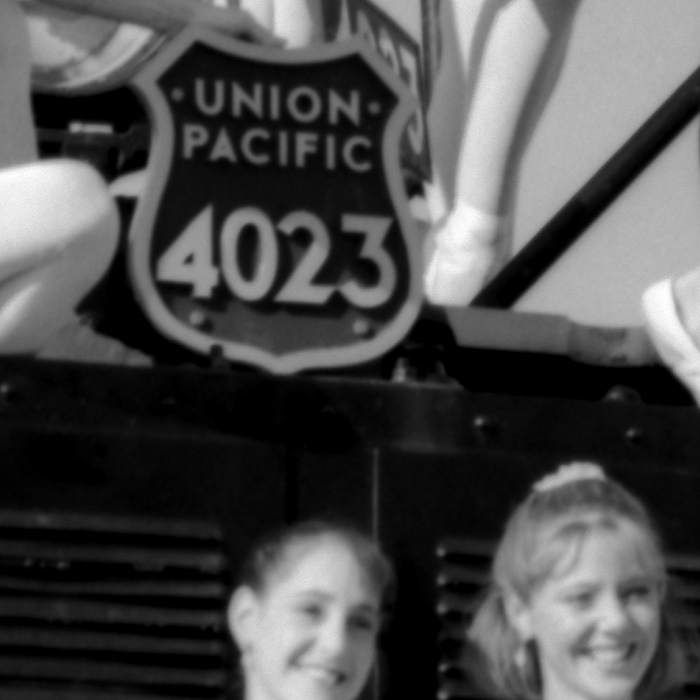
So, what do you think?
Would you be surprised to know that Image A came from the E-M 5 Mk II? It did!
Even with my improvised copying setup and non-optimized, non-macro lens, the camera copy (to my eyes) yielded a much sharper-looking, more-detailed result than the scanner copy.
What’s more, the full-size camera image had much less dust and required much less cleanup than the scanner image. That won’t surprise darkroom old-timers: a scanner shines a concentrated beam of light through the film, much like a condenser enlarger — and condenser enlargers were notorious for exaggerating dust, grain, and scratches. My copy stand rig, with its wide, diffuse light source, was more like printing with a diffusion enlarger — much more forgiving of negative defects.
The time difference was striking as well. I could clean, position, and expose a negative in the copy stand in less than 30 seconds, while the scanner took more than six minutes exclusive of prep. If you’re scanning all the frames on a 12-exposure roll (for example) that’s the difference between a 10-minute job and more than an hour of labor.
Of course I’m sure there are better, faster scanners than my Canon 8800F — and if you have one of them, good for you. But if you have an “average” scanner like mine, and if you’ve been considering the E-M 5 Mk II, the ability to make high-quality ‘scans’ with it is a nice additional bonus to take into consideration when deciding whether or not to buy.
–
E-M5II store links:
E-M5II in Black at Amazon, Adorama, BHphoto and GetOlympus.
E-M5II in Silver at Amazon, Adorama, BHphoto and GetOlympus.
E-M5II In Europe at AmazonUK, Jessops, WexUK, Namencolor.
62 Responses
I have done a similar thing. I used the backlight from my scanner as the light table, and the film holders to hold the film. It gets interesting to do the reversal of colour negs.
This is one of the advantages of Vuescan, it can scan negs (preferably with a negative holder/light on the flatbed scanner) and do the colour reversal in one go, and then it can be run in batch mode to repeat the same process over and over.
Maybe a stupid question, but what is the procedure for processing colour negatives in Lightroom, if I was to shoot them this way?
Interesting, and at first glance I agree with your conclusion – but, on closer examination there are some things I don’t like … look at the leg beside the plate – the shadow doesn’t seem right – there’s a hard mid tone line between light and dark, and again underneath the arm holding the number plate, the shadow doesn’t look natural. I wonder if this is a result of the lens, camera, or the sensor shift. Would be interesting to see results of a standard 16mp “scan” of same.
Maybe my original film-photography technique wasn’t so good! Anyway, this was just a quick proof-of-concept — I am sure there are lots of ways I can fine-tune the process, now that I know it basically works.
Those are natural shadows. The hand and leg has those strong shadows because muscles. It really should be strong transition.
Good to read interesting posts now and then! Thank you mr. Williams for sharing!
Yes, this was a good interest post with semi-low tech producing good results.
Reminds me E-M5s being used as film scanners. Here is a well integrated setup:
http://www.pekkapotka.com/journal/2012/11/11/copying-slides-with-om-d-and-60mm-macro.html
This is an excellent application of the sensor-shift feature of the E-M5II.
I’ve been using the NEX-7 and the 55mm f2.8 Micro-Nikkor with excellent results—this should trump it!
Nice article and excellent job.
Very surprised to see it performed petter than a scaner.
The resupkt are well worth the trouble. But I guess DIY project provided many joys by itself.
Time savings are a huge plus also! 🙂
Cool! Good work!
The 75mm can’t focus that close, can it?
With macro extension tube can…
Nice.
I’d love to hear the story behind the foto, by the way.
Not all that much to it really… Union Pacific was the ballet company’s corporate sponsor that year, so they wanted a photo that would tie in to the railroad in some way. This Big Boy locomotive was on static display near one of their yards, so they opened up the display for us; we drove all the dancers out there after a rehearsal. Helping a flock of beautiful girls climb up onto a huge locomotive was a lot of fun!
Thanks for sharing, interesting photo and what could look like an older piece of ‘Americana’.
I think it’s a great shot.
Not trying to undermine the achievement in anyway, but I wouldn’t go as far as saying that the E-M5mkII version is necessarily better (“sharper-looking, more-detailed”) – the scanned version just has much less contrast and apparently no (or very little) sharpening. Apply a decent amount of USM with good values, add a slight S-curve and you get an image that looks very much identical to the one from E-M5mkII. Not resolving any more actual details from the film, but not less either.
And of course the fact the E-M5mkII can achieve same kind of results than a decent flatbed scanner via this kind of DIY method IS a great achiement.
As noted above, I suspect that some of the difference is that my particular scanner doesn’t offer any fine-focus adjustment, so the scanner image wasn’t quite in focus in the first place. As you know, applying sharpening to an out-of-focus picture usually doesn’t help much!
Love the ingenuity…. and the result looks good too.
This comparison is bogus. Since the scanner cannot be focused and does not have sufficient DOF, it would be an accident if the result was similar.
I’d say that the comparison is a fair real world scenario. Most users don’t own the high end scanner that allows focusing but rather a digital camera like the Olympus.
Sorry to say so, but I think the camera image is oversharpened. I think the scanner image is not sharpened at all. So I’d like to see a comparison with optimized sharpening for both. The apparent difference might be much smaller after this…
No, I applied what I considered optimal sharpening to both, and the amounts were similar. The scanner image looks less sharpened because there was less fine film-grain detail to sharpen in the first place. I’m sure that’s only because my scanner offers no way to fine-focus, whereas the camera does — but that’s just a fact of life with most scanners. (I believe some of the Epson scanners have an adjustable film carrier that provides some focus adjustment, but without that you just have to settle for whatever the manufacturer used.)
Vuescan can perform multiple-pass scanning and reassembly. Did you use that?
I you read some scanner reviews you’ll see that typical desktop consumerlevel scanners usually deliver max around 2000 dpi real resolution. The 4800dpi is the resolution of the CCD, but with fixed focus and not too good optics, you can’t expect to get even close to the specifications.
With a 6×4.5cm negative (actually it’s slightly smaller) and 2000dpi you’d expect around 15 megapixel image. Scanning at higher resolution will just give more pixel and a soft looking image – as demonstrated in the article.
It would be extremely surprising if a Canon 8800F could match the qulity from E-M5 II with an excellent lens in high res mode.
I’m not shocked that image A is by Olympus. Very noisy and digital look, oversharpened too.
You have never worked with film, have you? What you’re seeing is simply film grain in proper focus.
What a dumdum.
Nothing against the camera, but as soon as I saw the two crops it was obvious which one was from the OMD-EM5 Mark II (I hate these crazy long names, OE6 would have been fine). It might make the better image when done, but that Oly sharpening is easy to spot.
Its a shame that the M5 mkII applies such a heavy hand to sharpening. My guess is that the close up is from the JPEG pic. I would hope that that RAW file could hold more detail than a JPEG but not have the over sharpening effects already embedded in.
Edit: I see below that the photographer said that sharpening was applied to to both photos.
Interesting article, good stuff.
Interesting, but, as some people already commented, there is not more detail in the camera “scan”, it just looks sharper. If you downscale the images to a sensible format (a 30% to 50% view of what we see here) and resharpen more intelligently, the scanner result will give you a perfectly sharp result that doesn’t show less detail, even though the scanner result looks out of focus in the massively oversized images which are shown here. But that’s how scans always look if they’re larger than what the real resolution of material and equipment provides for.
I don’t think that will happen. The scanned image is already downscaled for comparison.
Not scaled-down enough. Both images are by a pixel-count factor of perhaps 3 or 4 too large for anything that would constitute pixel-level sharpness.
I’d stick to my PlusTek 7200. Cheap, quick, and good enough. No need to fiddle with the orange mask.
1. Why not use an enlarging lens? It would be optimized for the flat scanned field and allow for full manual control. How can you be sure the camera body doesn’t shift during the removal and replacement of the Olympus lens? A bellows would be a good alternative to the extension tubes in a finished setup.
2. Is 40MP necessary? Does the resulting resolution exceed the original resolution of the film or lens with which the original picture was taken?
Thanks for the interesting article.
40MP obviously exceeds the resolution of the medium format film camera. I bet 16MP does too. People seem to forget how lousy film resolution was. Color print film was dreadful: 35mm iso 400 print film couldn’t make a good print over 5×7, and iso 100 would get you an ok 8×10. Black and white or slide film was much better but it looks like medium format film is still below contemporary MFT camera resolution.
That’s my impression, too – I think you need at least 6×7 medium format with low-sensitivity fine-grain film, an excellent lens and a near-perfect shot to boot in order to outresolve a perfect 16 MP shot with a current digital system camera, and you have to use a good (film) scanner, not a cheap flatbed scanner that effectively only reaches a fractional amount of the specified resolution.
This is very common problem with film scanning, which is that film isnt focused “right”. Latest Epson v850 has option to set height of plate in order to get film focused as sharply as possible. OM-D wont beat good dedicated film scanner, but its quite easier to get decently sharp “scan” out of it.
Its same reason why some scanners suck a bit, if not used with perfect film holders (or liquid), even tho they are superior in tech specs.
Did you try a separate without the high res mode as a baseline vs high res for others to see what kind of an advantage it is over the mark 1 version and if they can get similar yield if scanning neg from the older system?
I made a very crude rig for scanning slides when I got an E-M5 a couple years ago. It was based on the 12-50mm f3.5 – 6.3 kit lens – which could almost have been designed for the job. Setting the lens on macro means a very short lens to subject distance while still allowing you to photograph a full 35mm frame.
Prior to this method, I used to use a Polaroid Sprintscan 4000 which scanned slides and negatives at 4000 Dpi. That was more than enough to resolve film grain and resulted in scans of about 5400 x 3610 pixels. That resolution was more than sufficient for even Fuji Provia 100F.
Setting the frame aspect ratio to 3:2 when shooting 35mm frames gives you a 4608 x 3072 pixel result – which seems to be quite sufficient to resolve film grain. The 12-50mm set to macro also seems have perfectly sufficient resolution for this purpose so there is no need to use a sharper lens or the 40MP high res mode a E-M5 II is capable of. You could probably use any 16MP M4/3 body for this purpose.
Here is the rig i made:
http://i1351.photobucket.com/albums/p794/An0nemu5/Forum/SlideScan_zpsgnzxuxp5.jpg
The body is made from 8mm (?) camping/exercise mat foam pieces glued together with hot-melt glue. The slide support is just a plastic cap off a spray can with a rectangular hole cut out that is a bit larger than a 35mm frame. I sized the main tube to fit the cap. That makes it too wide to fit the 12-50 so I just glued a strip of the foam inside one end to reduce the diameter and make it a snug friction fit on the lens. By recessing the cap in one end, you get a slight lip of foam protruding, which grips the corners of a mounted slide and holds it securely in place. I also stuck some small pieces of steel on the inside of the cap so if I want to do strips of negatives, I can use 4 small neodymium magnets to hold the strip against the cap. Obviously I pull the cap out so there is no longer a lip of foam protruding.
Framing is accomplished by just sliding and twisting the whole rig relative to the lens. For a light source I usually use just a white sheet of paper on a window sill lit by sunlight. An overcast sky works well also. I set the frame ratio to 3:2, disable the IBIS and usually shoot at f8 and let the lens autofocus.
Here is an example of a result. Excuse the slide, it was taken by my father about 55 years ago on Kodachrome.
http://i1351.photobucket.com/albums/p794/An0nemu5/Forum/SlideScnE-M1_zps3vietibr.jpg
The 1:1 crop on the right shows you certainly don’t need any more resolution for that particular film.
I just wonder how long it took to get the dust and scratches cleaned up.
Dusts and scratches can be a pain. That’s why neg scanners with infrared dust removing function is still the right direction to go.
Good article, thanks. I prefer the camera version by a large margin. I’ve scanned a fair number of 35mm negatives. Curious if one would notice any difference in detail between a straight 16mp shot and the hi-res one. Most flatbed scanners already scan 35mm film (or let you) at higher resolution than 16mp.
Nice, but how did you get the sensor and the negative 100% level? I find it almost impossible to get edge to edge sharpness as either the camera or the negative tilts just a tiny bit..
this guy has no clue at all about scanning images… sorry but it´s the truth.
and the 8800 does not come even close to 4800 ppi.
the real resolution drops out at less than the half of that.
it´s a crappy outdated scanner. it´s good enough for prints but not for slides, negativs.
That’s a great negative and wonderful to see. My father was Superintendent of the Union Pacific Wyoming Division 1968-1974. He piloted those on a regular basis in the 1950s and early 60s. As I remember that’s a “BIG BOY” engine. The most powerful steam locomotive ever built.
A nice experiment, and an interesting result. Thanks for this.
I use a Plustek 8200i scanner and Silverfast software for 35mm color slides, and get better (sharper, more shadow detail, etc.) results than with my Canoscan 8600F (similar to your 8800).
Even with the Plustek, focus is a critical issue as others have mentioned. The otherwise-good Plustek doesn’t have manual focus. By trial and error, I found that the thickness of the slide mount is critical for focus. A cardboard mount, or a thin plastic mount from recent years, yields an image in focus. But an older, thick plastic mount from the 1970’s, or a Gepe mount (even with the glass removed) gives a defocused image.
There are some strange smearing artifact on the OMD version, maybe some postproccessed setting gone wrong ? The scanned version seemed to be a flatter, and better basis for some final post proccessing.
AWESOME. I use my EP5 to scan all of my film with an adapted A mount 100mm 2.8 macro. I didn’t even think about the implications of the EM5II. Freaking sweet.
Same question as Jimmy: how do you make it a positive from a negative? Do you just use the Photoshop “Negative” filter? How would you do a color negative?
Some misinformation about film resolution in these comments that should be taken with a grain of… ah, salt. Valiant try with the EM5. Wonder if a Macro lens would be an improvement.
Also, excellent shot.
I liked that the article did not assume every reader already understood the terminology. The explanations were simple without making the subject feel oversimplified.
Your posts are always so relatable and relevant to my life It’s like you know exactly what I need to hear at the right time
Your writing style is so engaging and easy to follow I find myself reading through each post without even realizing I’ve reached the end
Your positive and uplifting words are like a ray of sunshine on a cloudy day Thank you for spreading light and positivity in the world
Your blog has helped me become a more positive and mindful person I am grateful for the transformative effect your words have had on me
Your posts always leave me feeling motivated and empowered You have a gift for inspiring others and it’s evident in your writing
Your passion for this topic shines through in your writing It’s clear that you put a lot of effort and thought into your posts Thank you for sharing your knowledge with us
From the bottom of my heart, thank you for being a source of positivity and light in this sometimes dark and overwhelming world
Your posts are always so relevant and well-timed It’s like you have a sixth sense for what your readers need to hear